Skip to content

blog

eight colors, zero clutter
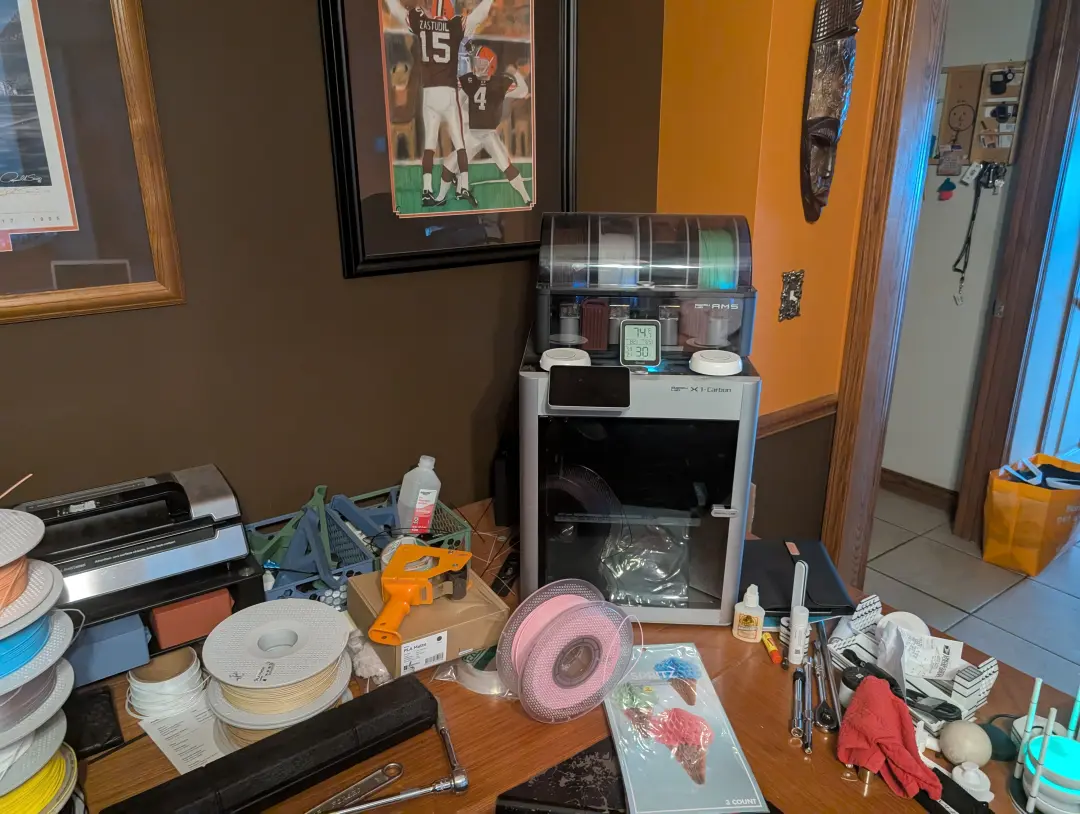

messy desk i'm excited to share my latest upgrade to my 3d printing setup: a second bambu lab AMS unit! this means i can now print in eight colors, opening up a whole new world of possibilities. but adding another AMS also meant i needed to rethink my storage and organization. keeping everything tidy and accessible on my desk was a challenge, especially since stacking two AMS units on top of the x1c wasn't feasible due to space constraints and the rear-mounted poop chute. my solution? a hybrid-custom-designed shelving system that maximizes space and keeps everything within easy reach.


from chaos to control: my new storage solution

iris 3-shelf eight-color printing? yes, please! i'm so excited about adding my second bambu lab ams and all the possibilities it unlocks. but with more colors comes two AMS devices, and i quickly realized i needed a better way to organize everything. that's when i stumbled upon the iris usa 3-tier shelf on amazon. it's incredibly strong, surprisingly affordable, and the perfect size for my workspace. so i figured i'd give it a shot.

after a quick assembly of the first shelf i realized that it was going to work as i thought it would. but, i knew with a few custom modifications, i could turn this ordinary shelf into the ultimate bambu lab ams rack. curious to see how it turned out? keep reading to learn about my diy journey and get inspired to create your own custom setup! i'll even share all of my models and projects!


quick start

TL;DR alert?? here are some quick links to get you going faster

  • models


    here is the .3mf model i used to print the rack extension kit. you'll need to print (2) sets of the base connectors and (4) of the leg extensions.


    all parts combined .3mf file

    original freecad file

    makerworld project

  • print profile


    here is the bambu-lab x1c project to download. this model include 2 sets of 4 legs. one set is shorter and the other is longer. you ONLY need to print either set - the longer ones or the shorter ones. you need to print 2 sets of the base extension pieces. 1 front and 1 rear piece for each side of the shelf - left and right.


    bambu studio project file


  • product list (1)

    1. - disclaimer: this site contains affiliate links. if you click on a link and make a purchase, i may earn a commission at no extra cost to you. i appreciate your support !!

    streamline your online shopping. quickly add recommended products to your cart for a faster, more convenient experience.

    you can change the quantities or remove items in your aws cart before checking out.

    click the cart+ button below to save time.

    once you click the button a new tab should appear and allow you to confirm all products before adding to your cart.

    give it a try now! (currently only works for amazon usa store)


    QTY Product
    1 iris usa 3-tier shelf
    1 (6 pack) iris usa 19qt storage bins
    1 (6 pack) praki large dry food storage containers
    1 asbrot ptfe tube

    cart+

  • iris usa 3-tier shelf


    iris usa 3-tier shelf


    made in usa with global materials - the iris usa 3-tier large storage organizer shelf is perfect for storing bins, sports equipment, tools, cleaning supplies, and more. made with recycled materials, this shelf is built to last.

    great size - dimensions: 35.88"l x 17.88"w x 37.88"h


    check it out @

  • iris usa 19qt storage bins


    iris usa 19qt storage bins


    made in usa: quality you can trust! our storage bins are proudly crafted in the usa using high-quality, durable materials, ensuring your belongings stay safe and secure.

    weatherpro gasket seal: these bins feature top-notch seals in the lid that create a vacuum-like environment to lock out moisture, dust, and more.


    check it out @

  • praki large storage containers


    praki large dry food storage containers


    bundle set: praki large airtight food storage containers with lids set comes with 6pcs (4l / 135.3oz) large cereal container, 20 labels and 1 marker. large capacity, suitable for storing a whole bunch of stuff, but really great for storing filament in an airtight container.


    check it out @

  • asbrot ptfe tube


    asbrot ptfe tube


    5m high-temperature resistant PTFE filament feeder tube with cutter for 3d printers: this 5-meter PTFE tube, featuring a 2.5mm inner diameter and a 4mm outer diameter, comes with a convenient cutter.

    its smooth surface ensures low friction and optimal filament feed. compatible with bambulab x1 series.


    check it out @


now, back to the story


problem statement

my initial setup was functional but far from ideal. with only one AMS unit, i was limited to four colors, and my workspace was cluttered with filament spools and tools scattered everywhere. the lack of organization made it difficult to find what i needed quickly, and the single AMS unit restricted my printing capabilities. i knew i needed a better solution to fully utilize my bambu lab x1c and streamline my workflow.


before image gallery(1)

  1. - if you click on an image you can scroll through the gallery of all images on this page

messy desk front messy desk corner messy desk iso messy desk main messy desk under storage messy desk leaf


hmmm... that's not right

rack with bottom shelf after setting up the shelf, i quickly realized the x1c wasn't going to fit. placing the printer in front wasn't an option either because of the poop chute. time for a new plan!

click on the image to the right to see the shelf opening is too small for the printer. i want to place both AMS units directly above the printer, which needs to fit inside the shelf. and don't forget, the poop chute needs a proper spot too!

normally, I would have just returned the shelf and started over. but now i think differently. i can remove the bottom shelf make something to support those legs and even create some legs myself and still be able to use that shelf.

solution: time to open up freecad and design a solution.


need it. make it.

rack ext base iso the real magic, however, came from some custom 3d printed parts. i designed and printed several modifications to the shelves, allowing my bambu lab x1c to fit snugly underneath, with both AMS units positioned conveniently above. this configuration solved the space issue and ensured easy access to the filament.

rack ext base iso let's start with the base. first i needed to be able to remove the bottom shelf and raise the whole shelf up so my bambu lab x1c can stay planted firmly on the desk and slide under the second shelf. i designed the rack extension base part in two pieces because it is larger than the print dimensions of my x1c. there is a simple connector groove that secures them together and the openings on the top fit the legs nice and snug. i padded out the bottom several inches to give me the clearance i needed to fit the x1c underneath the second shelf. you'll need one (a pair) of these for each side to secure the 4 legs that used to fit in the bottom shelf openings.

rack ext print front next are the leg extensions. since i didn't want to waste the shelf i was removing i also decided to design some leg extensions to place on the old top shelf and add the bottom shelf using (4) of these leg extensions. the legs fit into the opening of the top shelf and then the old first shelf has openings on the bottom that the leg extensions fit securely into. this keeps the whole shelf very sturdy. i kept the length of the leg extensions relatively small but you can adjust that in the freecad project that i shared above changing the parameters in the spreadsheet.

models are free for maker usage. not to sell.

i wanted to share these models to give back to the community as i have often benefited from other makers' free models, especially when printing parts for the x1c. all that said, these models can certainly be improved, that's why i included the original freecad project. i over-engineered these and they use a lot of filament. these models work for me, but no guarantee is being provided. use them at your own risk. secure the rack if you place it up on a desk. by downloading and using these models, you agree that you are responsible for any outcomes, and the creator is not liable for any damages or issues that may arise. these models are free for maker usage and not for commercial gain.


filament organization: clear and convenient

rack ext print front rack ext print front keeping my filament organized is crucial for a smooth printing workflow. i came across a reddit article where users were discussing the effectiveness of the praki large dry food storage containers with lids for storing individual filament spools. these containers are a game-changer for several reasons.

firstly, their clear design allows me to easily identify the filament color without having to open each container. this visual accessibility saves time and reduces the hassle of searching through multiple spools. secondly, the airtight lids are perfect for maintaining the filament's quality. they prevent the filament from absorbing moisture, which is essential for ensuring consistent print quality and avoiding issues like stringing or poor layer adhesion.

additionally, i have read that there are some 3d printable modifications available that can make these containers even more filament-friendly. these modifications might include spool holders or desiccant compartments to further enhance the storage conditions. i am currently on the lookout for these models and plan to test them out. once i find and verify their effectiveness, i will be sure to include the links and details here for anyone interested in optimizing their filament storage.

by integrating these storage solutions, i have significantly improved the organization and efficiency of my 3d printing setup. it’s a small change that has made a big difference in maintaining a clutter-free workspace and ensuring my filament is always in optimal condition for printing.


storage solution: clear and stackable

rack ext print front rack ext print front i also picked up some of the iris usa weatherpro 19 qt storage bins with lids for extra filament storage and other supplies. these bins are solid, made in the usa with high-quality, durable materials, and feature a weatherpro gasket seal to lock out moisture and dust. the tight buckle-up latches ensure a secure fit, and their stackable design helps save space. they are bpa-free, acid-free, and have a tapered design for easy nesting when not in use. a double stack of these bins fit very nicely on the iris usa shelf.

in addition to their durability and stackability, these bins are transparent, making it easy to see the contents without having to open each one. this is particularly useful for quickly identifying different filament colors and types. the weatherpro gasket seal is a game-changer for filament storage, as it helps maintain the filament's quality by protecting it from humidity and dust, which can degrade the material over time.

i've also found that these bins are versatile beyond just filament storage. they are perfect for organizing various 3d printing tools, accessories, and even small completed prints. the secure latches give me peace of mind that everything inside is well-protected, and the stackable design means i can maximize my vertical storage space, keeping my workspace tidy and efficient.

overall, the iris usa weatherpro 19 qt storage bins have been an excellent addition to my 3d printing setup, providing a practical and reliable solution for keeping my materials and tools organized and in optimal condition.


before photo after photo

summary

with my new shelving system and dual AMS setup, my 3d printing workflow has never been smoother. i've gone from a cluttered desk and limited color options to a clean, organized, and highly capable eight-color printing station.

next up. i plan on providing the step-by-step instructions i used to add my second ams to achieve 8 colors, zero clutter. thanks for reading.

alloatech's first commercial 3d printed product: part 1

in june of 2024 i decided to minimize my diet soda consumption and decided to try one of those soda machines to see if that could replace my fix for something bubbly without those artificial sweeteners. for many reasons i went with the aarke carbonator pro and i just love it. however, i soon found out that i drank a lot of carbonated water and then realized it was quite expensive to exchange those teeny-tiny tanks. read on to see how i decided to leverage my newly developed 3d modeling skills to create a novel solution to fizz more for less!